
Paralus can be installed on your local cluster using Kind to experience the product before taking it to production.
The quickstart guide can be followed to setup Paralus on a Kind cluster.
Table Of Content:
Kind
The following section talks about installing Paralus in a Kind cluster. Kind is a tool used to run local Kubernetes clusters using Docker container nodes. Learn more about Kind.
Installing and Configuring Kind
If you don't already have Kind installed on your local system, you can do so by following the Kind Quickstart Documentation. The default settings are good enough to get you started.
The next step is to create a Kind cluster. To do that you can create a copy of this configuration file and use that to create a cluster.
kind create cluster --config cluster.yaml
Note down the IP address of the control plane by running the following command
docker container inspect kind-control-plane --format '{{ .NetworkSettings.Networks.kind.IPAddress }}'
172.20.0.2
Installing Paralus
Add the paralus helm repository
helm repo add paralus https://paralus.github.io/helm-charts
helm repo update
   helm install myrelease paralus/ztka \
    -f https://raw.githubusercontent.com/paralus/helm-charts/main/examples/values.dev-generic.yaml \
    --set fqdn.domain="paralus.local" \
    -n paralus \
    --create-namespace
Tip: In case you get an error, run
helm dependency buildto build the dependencies.
Note: Since v0.1.9, elasticsearch is an optional component. By default, Paralus will use database (Postgres) as the auditlog storage component. If you're doing a fresh install, below are the values.yaml file that you must pass during installation:
- Postgres (default): https://raw.githubusercontent.com/paralus/helm-charts/main/examples/values.dev-generic.yaml
- Elasticsearch: https://raw.githubusercontent.com/paralus/helm-charts/main/examples/values.elasticsearch.yaml
You'll see the following output if the installation succeeds:
NAME: ztkarelease
LAST DEPLOYED: Wed Jun 15 09:05:49 2022
NAMESPACE: paralus
STATUS: deployed
REVISION: 1
NOTES:
1. Access the application URL by running these commands:
  Open http://console.paralus.local in browser.

You can view the default password for admin@paralus.local by running the following command once all the pods are running:

kubectl logs -f --namespace paralus $(kubectl get pods --namespace paralus -l app.kubernetes.io/name='paralus' -o jsonpath='{ .items[0].metadata.name }') initialize | grep 'Org Admin default password:'
Note: It can take upto a few minutes before all the pods are running and you can access the dashboard. You can check the status using
watch kubectl get pods
Configuring /etc/hosts
Since we are deploying Paralus on local cluster, we need to update the /etc/hosts file with the IP Address/Ingress Host name to access the dashboard.
In order to do that, edit the /etc/hosts file using your favourite editor and add the following line at the end of it along with the IP address obtained and save it.
172.20.0.2 console.paralus.local
Refer to the value of fqdn.domain in your values.yaml file to find the default host.
Open your favorite web browser and navigate to http://console.paralus.local, you will see the dashboard with the login screen.
Note: Docker-for-Mac does not expose container networks directly on the macOS host & hence you will not be able to access Paralus dashboard if you're on a Mac machine. We suggest using docker-mac-net-connect utility to overcome this issue.
Resetting Default Password
Paralus comes configured with default credentials that allow you to access the dashboard.
In order to get the default password, copy the command displayed after helm install and execute it
kubectl logs -f --namespace paralus $(kubectl get pods --namespace paralus -l app.kubernetes.io/name='paralus' -o jsonpath='{ .items[0].metadata.name }') initialize | grep 'Org Admin default password:'

Org Admin default password: 8[&C2(74^
In a new browser window/tab navigate to http://console.paralus.local and log in with the following credentials:
- username:
admin@paralus.local- or the one you specified invalues.yaml - password:
<generated above>
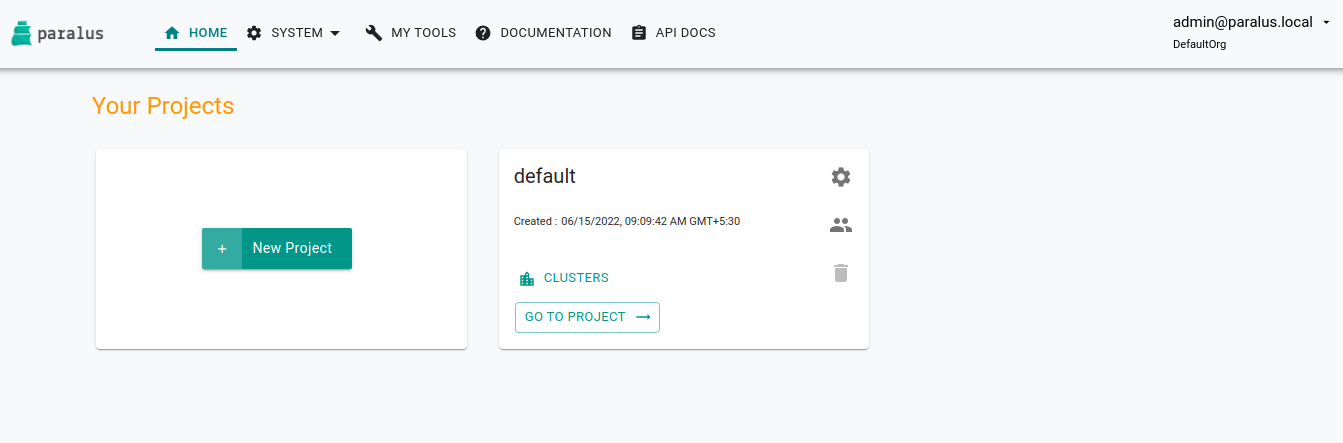
It will ask you to change the default password. Please provide new set of passwords to proceed. If successful, you'll be redirected to the projects page where you'll see a default project.
Importing Existing Cluster
Everything in Paralus is grouped into Projects. Each project will have clusters, users and groups associated with it. Hence the first step it to create a new project.
Click on New Project to create a new project and then import a cluster in that project.

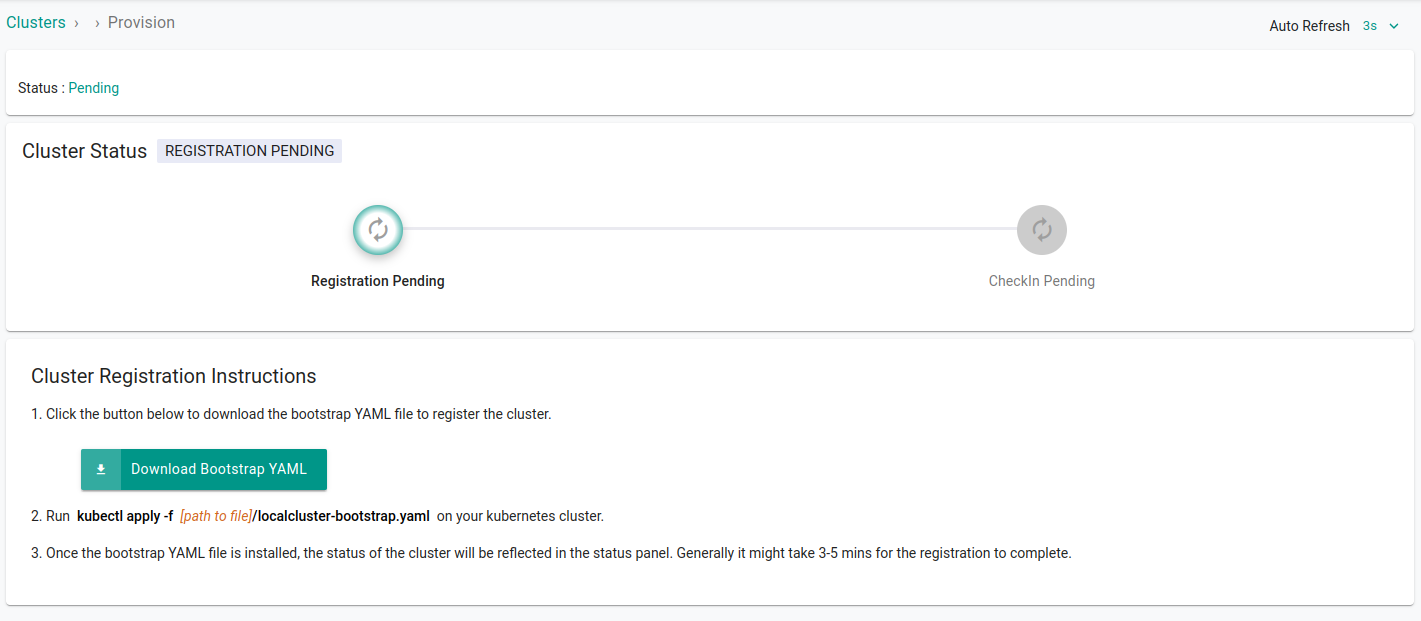
Click Continue and download the bootstrap yaml file by clicking Import Bootstrap YAML. This will download the YAML file that is required to connect your cluster with Paralus.
Configuring Network
Getting Cluster ID and Hostname
Open the downloaded yaml file in a text editor and look for clusterID
data:
  clusterID: 5dceca49-c6cd-4a2b-b65a-f193c4fa001f
  relays: '[{"token":"cakmpdvjd030q1q53p9g","addr":"console.paralus.local:80","endpoint":"*.core-connector.paralus.local:443","name":"paralus-core-relay-agent","templateToken":"cakl93fjd030q1q53p5g"}]'
With the clusterID identified, we need to update the hosts file. This becuase we are using hostname to route traffic.
5dceca49-c6cd-4a2b-b65a-f193c4fa001f.user.paralus.local
5dceca49-c6cd-4a2b-b65a-f193c4fa001f.core-connector.paralus.local
Updating /etc/hosts
Add two new lines in /etc/hosts file along with the IP address obtained
172.20.0.2 5dceca49-c6cd-4a2b-b65a-f193c4fa001f.user.paralus.local
172.20.0.2 5dceca49-c6cd-4a2b-b65a-f193c4fa001f.core-connector.paralus.local
Your final /etc/hosts file should be something like the following
172.20.0.2 console.paralus.local
172.20.0.2 5dceca49-c6cd-4a2b-b65a-f193c4fa001f.user.paralus.local
172.20.0.2 5dceca49-c6cd-4a2b-b65a-f193c4fa001f.core-connector.paralus.local
Accessing Existing Cluster
With all the changes in place, it's time to apply the bootstrap yaml file that we download while importing an existing cluster
kubectl apply -f mylocalcluster.yaml
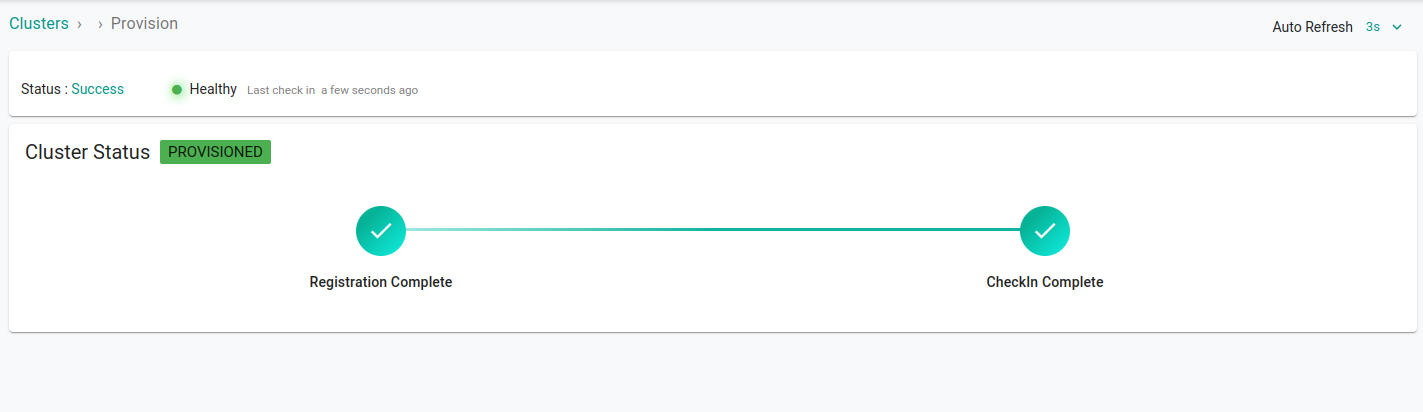
Wait for the changes to take place. On the dashboard you will see that the cluster is imported successfully. It usually takes 3-5 minutes for the status to update.
You can also execute
kubectl get podsto check the status.
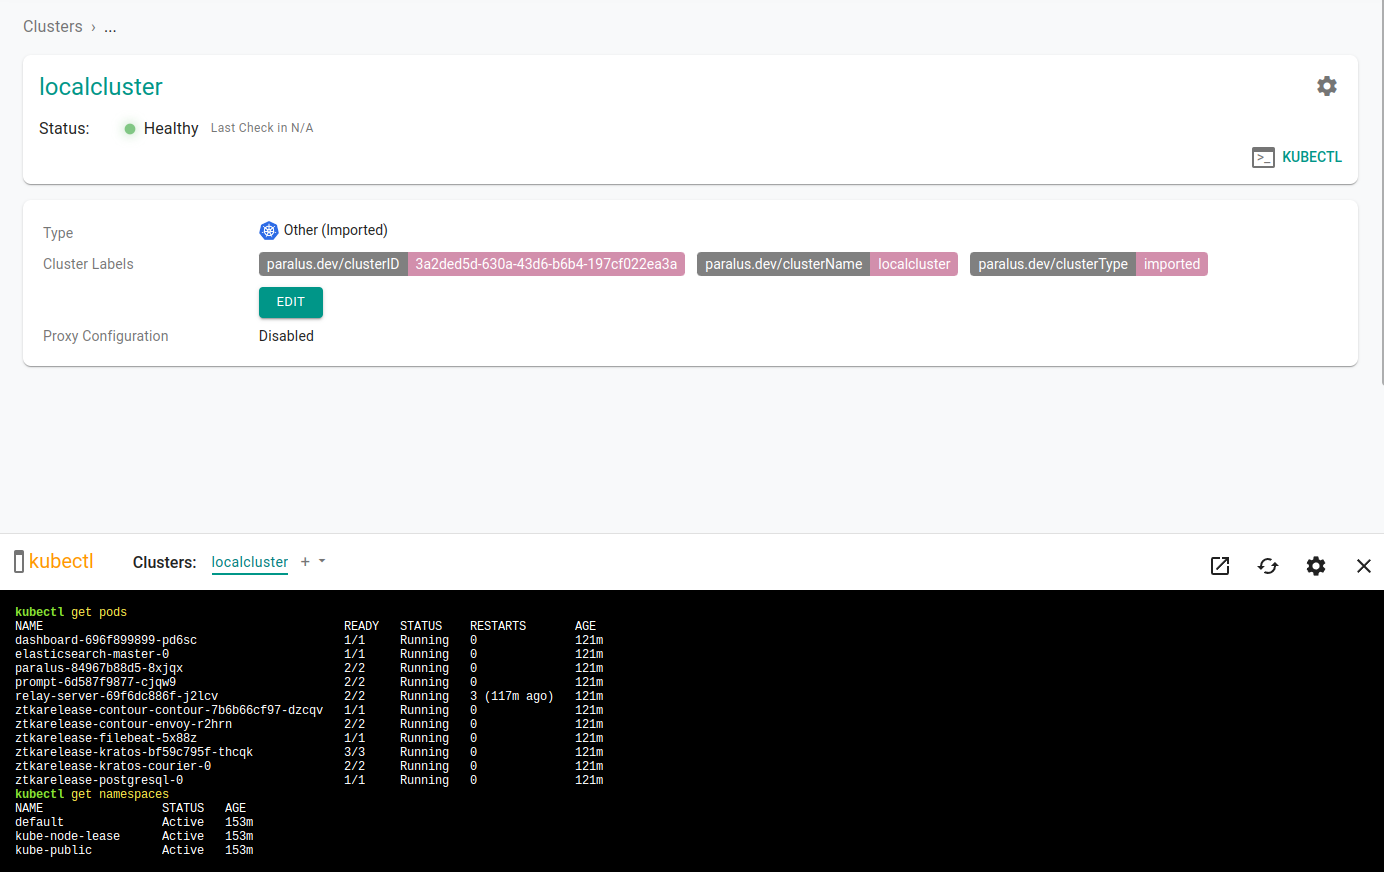
Select your newly imported cluster and click on kubectl to access the prompt and interact with your cluster from the dashboard.
A kubectl console will open in the bottom half of the screen, enter your kubectl commands to interact with your cluster.
Congratulations! You've successfully deployed Paralus and imported a local cluster.
Refer to our documentation to learn about various features of Paralus.
